Tuesday, November 12, 2019

Adding landscaping materials to the mountains!

     Well, it has been awhile since our last post but things have been moving along.  Wiring is basically done except for the rail yard but that is a long way off.  In fact, we've been talking about either replacing the yard with a round-house or adding a round-house next to the current yard.  In any case, all the rest of the track is electronically connected and working!!  Even the reverse loops are working much to Jeff's surprise.

     Therefore, activities are now moving into scenery construction.  Our last post showed Aiden & Anthony helping to put cardboard strips down in the logging area and using plaster cloth to cover the strips.  That went very well and we have expanded that into the mountains area as well.  This past weekend Aiden was out once again and we started to paint the plaster with some earth tones and to sprinkle dirt onto the wet paint.
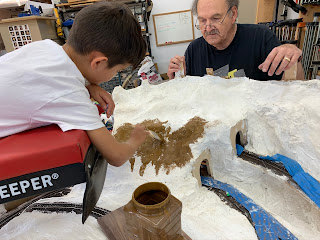


Aiden painting earth tone onto the mountain area


more painting
      Aiden used our 'Creeper' to lay out over the layout and paint the plaster.  The Creeper is on casters so it can roll right up to the layout and then the padded platform extends out over the layout.  You can lay on the platform and reach down to work on the layout.


A flour sifter filled with very fine dirt to spread the dirt onto the wet paint
      Jeff went to to the local Class A baseball stadium and collected up some really nice dirt in a large container.  He sifted the dirt into three categories....very fine, medium and small stones and clumps.  We used a four sifter, which is used in baking, to spread the very fine dirt over the wet paint.  When dry, the dirt sticks to the plaster as a base layer.  We will add various grades of heavier dirt, ground moss and grasses on top of this layer.


Aiden thinks he is flying on the Creeper


     The mountain area painted and dirt spread onto of the paint.  This is the base layer but you can see the rolling terrain really nicely.  Our next step is to add various other layers of ground coverings to make it look more and more realistic.   We are using very small shavings of Tiger Maple wood that come from the jointer and planer to simulate some mossy ground cover.  The type of ground cover you would see in a forest.  We will take the shavings and dye them with some Light Brown dye and sprinkle them over the terrain in a random fashion.


     Jeff is putting diluted glue onto the ground covering to keep it in place.  You can see in the picture that we've applied the mossy ground cover along with s mixture of different colored field grass.  We used a static grass applicator to apply the grass,  It is supposed to make the grass stand up but that didn't work to well today.  Not sure if it is machine or operator error!!  Additional glue is dripped on and also sprayed on with a spray bottle to help keep things in place.  

     Next steps:

     We will continue to expand around the curve in the mountains and continue this process.  Once the initial ground base in down we will take out the wooden tunnel portals and replace them with painted stone portals.  There is also a waterfall, pond and creek that will get painted and simulated water applied.  However, the big project now is to make trees and more trees and more trees.....you get the idea!!


Wednesday, January 23, 2019

We've Started the Scenery

It's been a while since we posted anything, mainly due to the holidays.  But we've been working on the railroad and have continued to make progress.  First off, we've now gotten all of the Tortoise switch control boxes installed.  There are 19 in all, grouped into three zones.  We also have two of the zones--the logging area and the town area--temporarily wired, so we can throw the turnouts using the NCE controller.  The yard area is not yet wired and the seven turnouts there remain in waiting.

Next up for the turnouts is to build control panels.  Our plan is to insert printed plans of the layout behind thin acrylic sheets and mount the assembly on a hardboard sheet for stability.  We will then install push buttons to control the turnouts.  Red and green lights will indicate which way the turnout has been thrown.  We will have three panels in different locations convenient for operation in the logging, town and yard areas.

The biggest news is that we have now begun building scenery on the layout.  We began with the hillside where the logging camp, forest and farming area will reside.  Several structures will go into this area--the logging camp buildings and facilities, a barn and farm-related items--but a lot of the area will be open forest with lots of trees. 

Jeff's grandsons Anthony and Aiden participated in the scenery-building.  We first laid strips of cardboard we ripped to about 1 1/2" wide on the table saw, creating a lattice.  We attached these to the plywood track base with staples and hot glue.  A word of advice: don't get the hot glue on your fingers; it will cause 2nd degree burns.  Don't ask us how we know.
With the lattice work woven into place, Jeff is stapling the joints to give the structure greater stability.
Once the lattice work was in place, we dipped plaster cloth, the kind used to make casts, in water and draped them over the cardboard, smoothing them down to fully engage the plaster and leave as seamless a surface as we could.  The boys did all the messy work of laying down and smoothing the plaster strips and had a ball doing so.  After the first round of plaster cloth set up, we put on a second layer.  When fully set up, this created a hard shell on which we can continue adding scenery.
Anthony (left) and Aiden apply the plaster cloth and smooth it down to get a seamless result.  This is messy work.  The boys loved it!
Our next job is to paint the plaster with latex paint--PPG Tobacco Brown--and then coat the area with Lou Sassi's "ground goop."  Once that base has been applied, we'll fully detail the area with trees, grasses, and the like.
The finished project, with two layers of plaster cloth.  We'll smooth this out with Plaster of Paris, then paint it Tobacco Brown and apply "ground goop" before proceeding to detail the area.  This is where the logging camp and farming area will reside.

We reported earlier that we are now running trains.  We have the "outer loop" pretty much debugged and track problems corrected, but the "inner loop" has a number of issues yet to be addressed.  We're happy to report, though that we've tested the reversing loops and the electronics seem to be working as intended.  We've tested the track with several locomotives.  Most are still set for the default cab number of 003.  We will soon reprogram them to their locomotive numbers so we can run multiple trains at once, something we've not yet tried.

So, while we've made a lot of progress in building the North Fork & Crooked Run Railway, there are still a lot of opportunities and challenges left for us to take on.  Stay tuned for updates.